Arduino Polygraph Shows How It's Done - Hackaday
Arduino Polygraph Shows How It's Done - Hackaday |
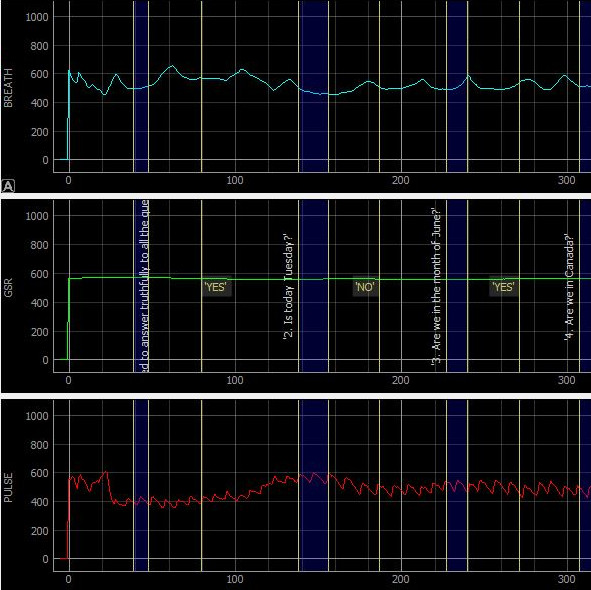
| Arduino Polygraph Shows How It's Done - Hackaday Posted: 25 Dec 2019 04:00 AM PST
[Juangg] designed it to use three sensors: a pulse sensor, a breath sensor, and one to measure Galvanic Skin Response (GSR). The pulse sensor uses a piezo element pressed against a fingertip to detect changes in pressure resulting from blood flow. It can be picky about placement, but finding sweet spot can yield remarkably good readings. The breath sensor works on a similar principle but uses a 3D printed fixture to hold the sensor between a strap and the subject's chest, so that breathing in and out can be detected. The GSR sensor is a voltage divider used to measure small changes in skin conductivity. How well does it all work? That depends on what one is looking to get out of it, but the documentation and design files are available from the project page and the GitHub repository if anyone wants a reference for similar work. The polygraph may have a mixed reputation, but it makes a good project that demonstrates just how messy biometrics can be from an engineering perspective. And in case you missed it, here's a reminder that Wonder Woman and the polygraph have much more in common than you might realize. |
| You are subscribed to email updates from "how does a polygraph work" - Google News. To stop receiving these emails, you may unsubscribe now. | Email delivery powered by Google |
| Google, 1600 Amphitheatre Parkway, Mountain View, CA 94043, United States | |


Comments
Post a Comment